Introduction
Sometimes you need a break from the monotony of the world and want to develop a silly project. That was my motivation for this post and idea to build a slack bot, which has many more use cases and simple silly commands.
In this post, I’ll run down how to build a minimal slash command bot and deploy it to Heroku.
Some of the technologies we are using:
How it works:
-
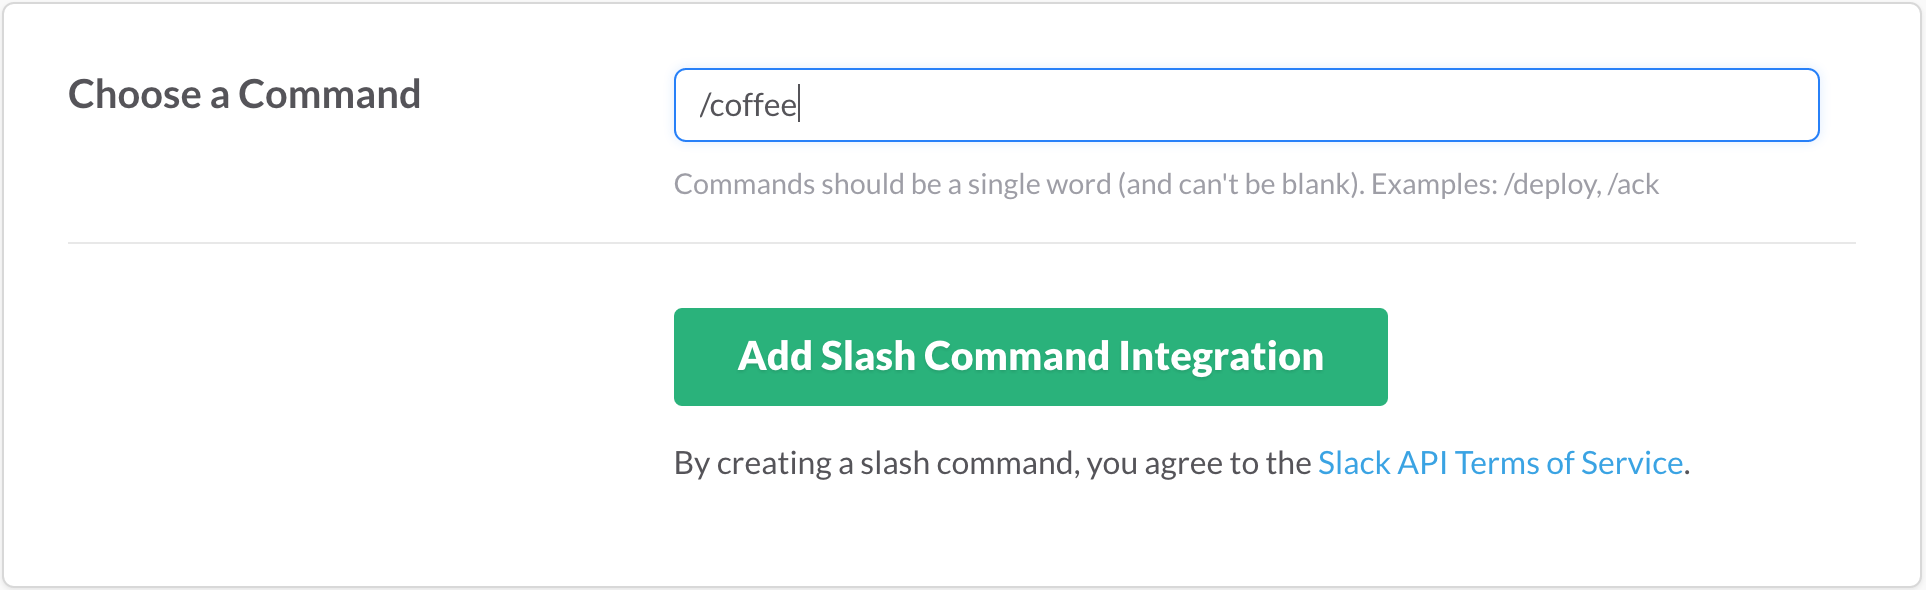
You type a /command in Slack - e.g.
/coffee -
Slack sends the request to our Heroku app
-
Our App recieves the request and processes it
-
Our App returns a response
-
Slack interprets response and handles it accordingly
-
Get coffee!
Repo is here.
Getting Started
Make sure we have Elixir and Erlang installed. If you are on a Mac with Homebrew, you can run brew install elixir. If you are not on a Mac or have Homebrew you can follow the instructions on Elixir’s website. Once we have Elixir and Erlang installed we can get started!
Let’s create a new elixir project. In your terminal, navigate to your usual project directory and type mix new coffeebot.
The terminal should spitout the following:
* creating README.md
* creating .gitignore
* creating mix.exs
* creating config
* creating config/config.exs
* creating lib
* creating lib/coffeebot.ex
* creating test
* creating test/test_helper.exs
* creating test/coffeebot_test.exs
Mix is Elixirs built in build tool. This will allow us to compile and run our project.
Our dependency list is very minimal but very important. These instructions taken from the Readme’s on both projects.
Open up mix.exs and replace
defp deps do
  []
end
with
defp deps do
  [{:trot, github: "hexedpackets/trot"},
   {:poison, "~> 1.4"}]
end
and
  def application do
    [applications: [:logger]]
  end
with
  def application do
    [applications: [:logger, :trot]]
  end
Inside config/config.ex add the following lines at the bottom:
config :trot, :port, 4000
config :trot, :router, Coffeebot.Router
Note: you can change the port to any number you want, the default port is 4000.
Let’s install our dependencies now! Run mix deps.get.
Creating a basic route
Open up coffeebot.ex. This is our main file and we will keep everything here for the sake of the tutorial.
We will use a basic example to get started and make sure everything compiles correctly and that the routing is working. The whole file should look like this:
defmodule Coffeebot.Router do
  use Trot.Router

  get "/" do
    "Hello World"
  end
end
We defined the router for Trot to use in our config file so we needed add it to our module. Next we imported the Trot.Router which gives us access to the methods we need for our router. We are using a basic route, just going to the index of the server and serving up a “Hello World”.
Seems simple enough! Let’s try it out! Run mix trot.server to compile the app and serve it at the port we specified above, 4000. Visit your browser at, http://localhost:4000 and you should see Hello World.
In the console, you may notice an error that looks like the following:
12:46:35.163 [error] #PID<0.285.0> running Coffeebot.Router terminated
Server: localhost:4001 (http)
Request: GET /favicon.ico
** (exit) an exception was raised:
    ** (Plug.Conn.NotSentError) a response was neither set nor sent from the connection
        (plug) lib/plug/adapters/cowboy/handler.ex:42: Plug.Adapters.Cowboy.Handler.maybe_send/2
        (plug) lib/plug/adapters/cowboy/handler.ex:16: Plug.Adapters.Cowboy.Handler.upgrade/4
        (cowboy) src/cowboy_protocol.erl:442: :cowboy_protocol.execute/4
Which is saying that there is no route for “get /favicon.ico”. We don’t care about the favicon for this example so we can add this line just above the last end, import_routes Trot.NotFound. Save it and it will recompile the app for you. No more error!
Updating Our Payload For Slack
Now that we got our initial route, we can flush out the rest of it.
Taking a look at Slacks Documentation we can see how their payloads are formatted. Here is the example they give us:
{
    "response_type": "ephemeral",
    "text": "Here are the currently open tickets:",
    "attachments": [
        {
            "text": "#123456 http://domain.com/ticket/123456 \n
            #123457 http://domain.com/ticket/123457 \n
            #123458 http://domain.com/ticket/123458 \n
            #123459 http://domain.com/ticket/123459 \n
            #123460 http://domain.com/ticket/123460"
        }
    ]
}
The only things we care about, in this example, are the repsonse_type and text. Let’s change our “Hello World to be in the format”. Here we are using Elixir’s Map data structure.
%{"response_type" => "in_channel", "text" => "༼ つ ◕_◕ ༽つ Heres your coffee :coffee: ༼ つ ◕_◕ ༽つ"}
There are two repsonse types, in_channel and empheral. Empheral will only show the message to you, and in_channel, well, will show the message in the channel the command was given from. Save your changes are refresh your browser, you should see the new payload.
Handling Our Connection
So we have the message we want to send back to Slack, but we need to be able to handle the incoming request and send the correct response. Let’s do that now.
Trot gives us access to the conn variable, this stands for connection. In essense, we are taking the conn, transforming it, and returning it. This is how Elixir and functional programming works!
Slack requires the response content type to be ‘application/json’, so lets set that as well as our formatted response with the correct http status code(200 means everything is okay!):
  get "/" do
    conn = put_resp_content_type(conn, "application/json")

    message = %{"response_type" => "in_channel", "text" => "༼ つ ◕_◕ ༽つ Heres your coffee :coffee: ༼ つ ◕_◕ ༽つ"}
    |> Poison.encode!([])

    send_resp(conn, 200, message)
  end
In the middle you notice the |> Poison.encode!([]). The |> (pipe) operator feeds the result of the previous line into the next function. Very handy for chaining things together. Poison.encode! turns our map into JSON for Slack to consume.
If you save and refresh your browser, there should be no difference! Let’s deploy to Heroku now!
Deploying to Heroku
Login or create your account at Heroku.com. Once you are in and on the dashboard, create a new app. You can name the app whatever you want, I like letting Heroku decide.
Heroku should now take you to the Deploy page for your app. Here it instructs you to install the Heroku ClI and setup your git config. Please follow the instructions up until the actual deployment!
Elixir is still a new language and Heroku doesn’t support the Elixir Buildpack officially. Fortunately, someone has made a buildpack for us.
All we have to do for this to work is type heroku buildpacks:set https://github.com/HashNuke/heroku-buildpack-elixir in our console.
Once that is done, we have a few more bits of configuration before we can deploy.
Ports and Procfiles
Heroku will tell our app which port to use, so we need to set our port to be dynamic. We can make this simple change by changing our port number, from config :trot, :port, 4000, to config :trot, :port, System.get_env("PORT"). If you want to make sure its working you can run PORT=4000 mix trot.server and it will work the same.
The Procfile contains any commands we want to run after we deploy our app, in our case its web mix.trot.server. Web, in this case is the default process for Heroku apps. Create a Procfile, without any extension, like .txt, etc. Place the following within the Procfile: web mix trot.server.
Add and commit your new files to git and run through the rest of the instructions on Heroku.
We can now deploy to Heroku. Run git push heroku master. It will build and deploy your app.
If you run into the following error:
 (Mix) You're trying to run :coffeebot on Elixir v1.2.6 but it has declared in its mix.exs file it supports only Elixir ~> 1.3
remote:  !     Push rejected, failed to compile Elixir app.
remote:
remote:  !     Push failed
remote: Verifying deploy...
Change your mix.exs file change elixir: "~> 1.3", to elixir: ">=1.2.6",, then add, commit, and push your files again.
Add the end of a long string of text we should see:
remote:
remote: -----> Compressing...
remote:        Done: 65.2M
remote: -----> Launching...
remote:        Released v3
remote:        https://[your app].herokuapp.com/ deployed to Heroku
remote:
remote: Verifying deploy... done.
To see if your app is up, type heroku ps. You should see something similar:
=== web (Free): mix trot.server (1)
web.1: up 2016/08/25 13:51:05 -0400 (~ 1m ago)
Going back to our Heroku Dashboard, we can click the Open App button, we will need this URL for Slack.
Let’s configure slack now!
Configure Slack Slash Command
With our app deployed on heroku, we can now create a new slash command. Easiest way to get there is to go to https://[your domain].slack.com/apps/build/custom-integration. Make sure you put in your teams domain. Select the slash command and lets get started.
Here is the config to use(I ommitted my details, but your key should already be there):
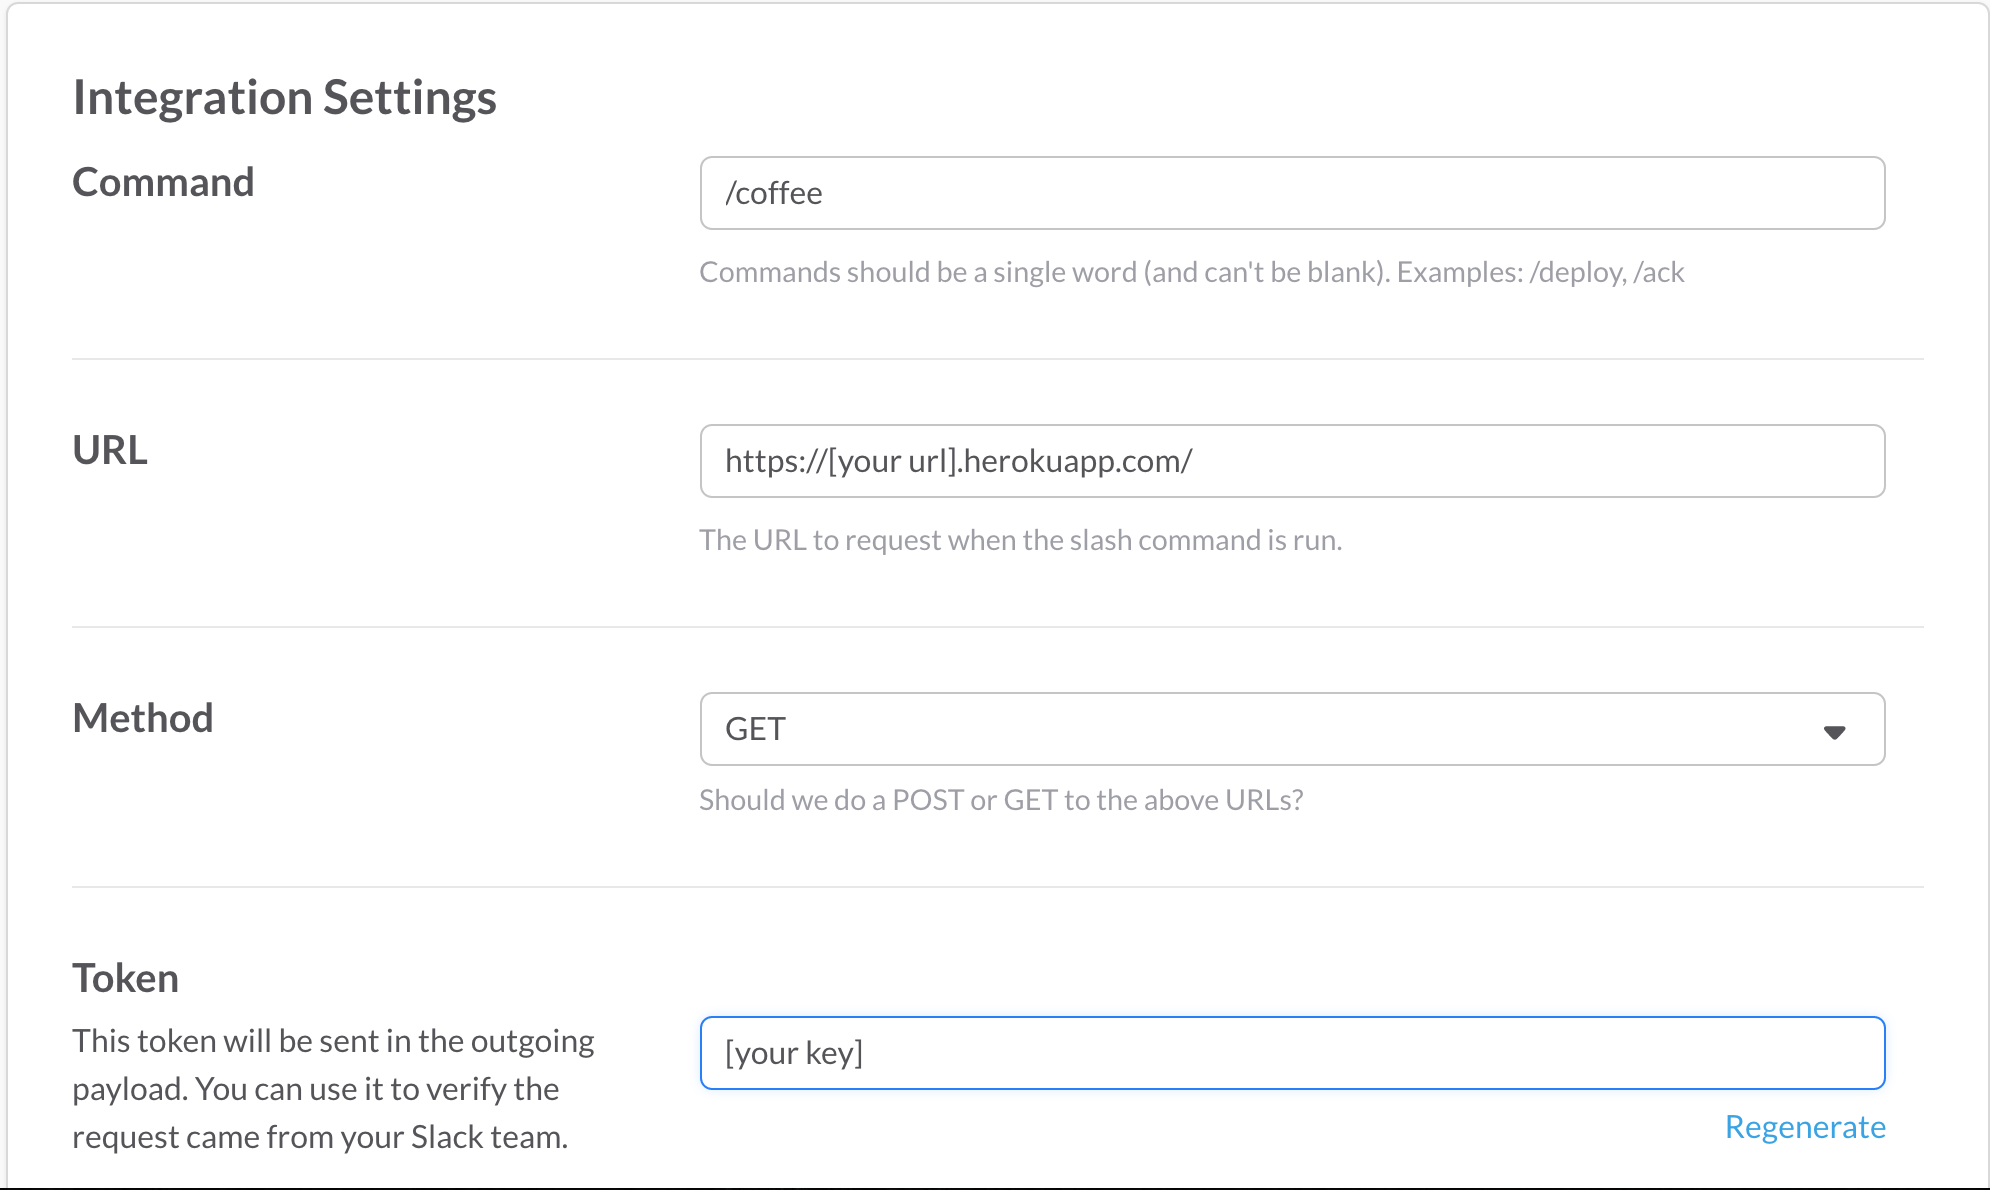
You can configure a description and name for your command. I called mine coffeebot. You are free to choose which name you want. Let’s save the integration and test out our command!
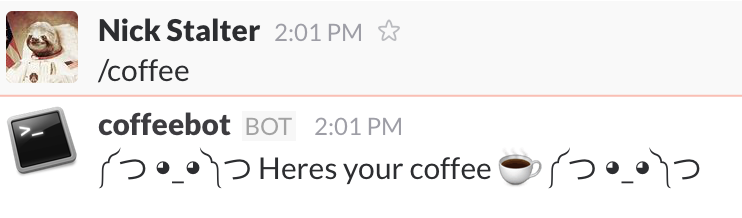
It’s working as intended!
Next Steps
We can lock down our api key by parsing the request we get from Slack and comparing it to the key they gave us. This should be done for security sake, This may be covered in an upcoming post since this one is a bit long.
Once we start throwing in some more code we may want to break things out into separate modules and we can use the same Heroku node to serve up separate commands. Just add another route!
Conclusion
So we created a very simple slack bot, deployed our app to Heroku and, hopefully, got some coffee. Some of the use cases arising from this integration would be, a command to deploy code to your servers, a command to get the weather for a certain area, or maybe we want to make more silly/useless bots.
If you run into any issues, please feel free to reach out to me by any of the means below.
Repo is here.